Kingdom Death Monster 1.5 Painting Diary
This post is a work in progress document with updates as I go along.
Build Diary
Tools Needed: Hobby Knife, Green Stuff, Needle Files, CA Glue, Sprue Cutters and Patience
Seriously go here: Build Instructions
Tips and Lessons Learned:
From my Gunpla and model building experience having a good Sprue/side cutter, is a must. Don't clip right at the end where the sprue meets the sculpt but farther back. Later you can clean up the nubs with a hobby knife/file. This is to ensure you don't accidentally cut a piece you aren't supposed to. As well you don't stress the plastic; although in this case we are painting the model after so any stress marks will be covered up.
Greenstuff! - I found working with the solid stuff a bit frustrating on models as delicate as these and resorted to using the liquid greenstuff. My mistake was not waiting for it to dry before the next coat and thus added a lot more sanding to the process. in this case less is more!


Priming
Survivors
Primer: Vallejo Black (not thinned) and Azimuth effect Vallejo White (Not Thinned) - Via Brush
Medium: Vallejo - Thinner Medium 70.524
Lion

Primer: Vallejo Grey(not thinned) Via Airbrush
Medium: Vallejo - Thinner Medium 70.524
Colour Diary
Survivor Allister

Skin: 1. Base - Formula P3 - Khardic Flesh
2. Wash - Citadel (Shade) - Agrax Earthshade
3. Glaze - Formula P3 - Menoth White Highlight and Midlund Flesh - ratio 2:1
4. Shading - Citadel (Shade) - Water and Nuln Oil - ratio 10:1
5. Highlight - more of the Glaze Mixture
6. Highlight - Vallejo Model Color - Ivory
Cloth: 1. Base - Vallejo Model Color - Ivory
2. Wash - Citadel (Shade) - Nuln Oil
3. Highlight - Vallejo Model Color - Ivory and White.
Hair: 1. Base -Vallejo Model Color White Grey
2. Wash - Citadel (Shade) - Nuln Oil
3. Glaze - Vallejo Model Color - Deep Yellow
4. Highlight - Vallejo Model Color White Grey and White
Lantern and Stone: Vallejo Model Color Black, Grey and Black Grey, White, Golden Yellow, Nuln Oil
Sealant: Vallejo Matt Varnish 70.520


Sealant: Vallejo Matt Varnish 70.520
Survivor Erza

Skin: 1. Base - Formula P3 - Khardic Flesh
2. Wash - Citadel (Shade) - Agrax Earthshade
3. Glaze - Formula P3 - Menoth White Highlight, Midlund Flesh, and Vallejo Model Color Golden Yellow - ratio 2:1:0.1
4. Shading - Citadel (Shade) - Water and Nuln Oil - ratio 10:1
5. Highlight - more of the Glaze Mixture with slowly decreasing the amount of Golden Yellow till none in the final layer
6. Highlight - Vallejo Model Color - Ivory
Cloth: 1. Base - Vallejo Model Color - Ivory
2. Wash - Citadel (Shade) - Nuln Oil
3. Highlight - Vallejo Model Color - Ivory and White.
Hair: 1. Base -Vallejo Model Color Black Grey
2. Wash - Citadel (Shade) - Drakenhof Nightshade
3. Glaze - Vallejo Model Color - Black Grey and Fluro Blue
4. Highlight - Vallejo Model Color Flouro Blue and White
Lantern and Stone: Vallejo Model Color Black, Grey and Black Grey, White, Golden Yellow, Nuln Oil
Sealant: Vallejo Matt Varnish 70.520
Survivor Lucy

Skin: 1. Base - Formula P3 - Khardic Flesh
2. Wash - Citadel (Shade) - Agrax Earthshade
3. Glaze - Formula P3 - Menoth White Highlight and Midlund Flesh - ratio 1:1
4. Shading - Citadel (Shade) - Water and Nuln Oil - ratio 10:1
5. Highlight - more of the Glaze Mixture adding more White Highlight slowly at each step
6. Highlight - Vallejo Model Color - Ivory
Cloth: 1. Base - Vallejo Model Color - Ivory
2. Wash - Citadel (Shade) - Nuln Oil
3. Highlight - Vallejo Model Color - Ivory and White.
Hair: 1. Base -Vallejo Model Color Red, Deep Yellow, Orange
2. Wash - Citadel (Shade) - Carrusburg Crimson
3. Highlight - Vallejo Model Color White Grey and White
Lantern and Stone: Vallejo Model Color Black, Grey and Black Grey, White, Golden Yellow, Nuln Oil
Sealant: Vallejo Matt Varnish 70.520, Citadel Nuln Oil Wash
Survivor Zachary

Skin: 1. Base and Glaze - Formula P3 - Khardic Flesh + Vallejo Brown Sand - ratio 1:3
2. Wash - Citadel (Shade) - Nuln Oil
3. Shading - Citadel (Shade) - Water and Nuln Oil - ratio 10:1
4. Highlight - more of the Glaze Mixture adding more MenothWhite Highlight slowly at each step
Cloth: 1. Base - Vallejo Model Color - Ivory
2. Wash - Citadel (Shade) - Nuln Oil
3. Highlight - Vallejo Model Color - Ivory and White.
Hair: 1. Base -Vallejo Model Color Black
2. Wash - Citadel (Shade) - Nuln Oil
3. Highlight - Vallejo Model Color Black Grey
Lantern and Stone: Vallejo Model Color Black, Grey and Black Grey, White, Golden Yellow, Nuln Oil
Sealant: Vallejo Matt Varnish 70.520
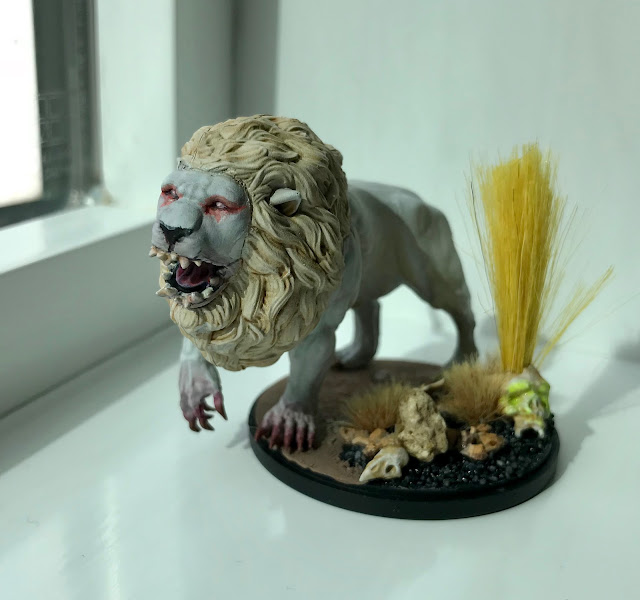
White Lion

Skin: 1. Wash - Body with Nuln Oil, Mane, tail, and underbelly with Seraphim Sepia. Nuln oil in a 20:1 ratio then 15:1 Water to Nuln Oil. Hair in a 5:1 ratio of Water to Seraphim Sepia.
2. Highlight - Vallejo Model Color - Sky Grey
3. Highlight - Vallejo Model Color - White Grey
4. Base - Mouth - Vallejo Black then painted Tongue Vallejo Pink then pink with Vallejo red and washed with Carrusburg Crimson wash. Teeth are Vallejo Ivory with some agrax wash at the base of the teeth and then re highlighted with ivory.
5. Base - Claws - Vallejo Ivory then washed with full strength Agrax Earthshade. After I washed with diluted Carrusburg Crimson 3:1 water to wash ration around the hands and mouth. I then went back with full strength Carrusburg on the front paws to emulate blood stains.
Basing: Primed in Vallejo Black, covered empty space with layer of Woodland Scenics Black Fine Corse rocks. Then a second layer of Army Painter Battlefield rocks, and random rocks. Then added a large stone and some Games Workshop skulls and Woodland Scenics tall Grass. the other side I finished with the agrellan Earth Technical crackle paint from Games Workshop. pinned the lion to the base and secured with some CA Glue.
Sealant: Vallejo Matt Varnish 70.520
Skin: 1. Wash - Body with Nuln Oil, Mane, tail, and underbelly with Seraphim Sepia. Nuln oil in a 20:1 ratio then 15:1 Water to Nuln Oil. Hair in a 5:1 ratio of Water to Seraphim Sepia.
2. Highlight - Vallejo Model Color - Sky Grey
3. Highlight - Vallejo Model Color - White Grey
4. Base - Mouth - Vallejo Black then painted Tongue Vallejo Pink then pink with Vallejo red and washed with Carrusburg Crimson wash. Teeth are Vallejo Ivory with some agrax wash at the base of the teeth and then re highlighted with ivory.
5. Base - Claws - Vallejo Ivory then washed with full strength Agrax Earthshade. After I washed with diluted Carrusburg Crimson 3:1 water to wash ration around the hands and mouth. I then went back with full strength Carrusburg on the front paws to emulate blood stains.
5. Base - Claws - Vallejo Ivory then washed with full strength Agrax Earthshade. After I washed with diluted Carrusburg Crimson 3:1 water to wash ration around the hands and mouth. I then went back with full strength Carrusburg on the front paws to emulate blood stains.
Basing: Primed in Vallejo Black, covered empty space with layer of Woodland Scenics Black Fine Corse rocks. Then a second layer of Army Painter Battlefield rocks, and random rocks. Then added a large stone and some Games Workshop skulls and Woodland Scenics tall Grass. the other side I finished with the agrellan Earth Technical crackle paint from Games Workshop. pinned the lion to the base and secured with some CA Glue.
Sealant: Vallejo Matt Varnish 70.520


Comments
Post a Comment